
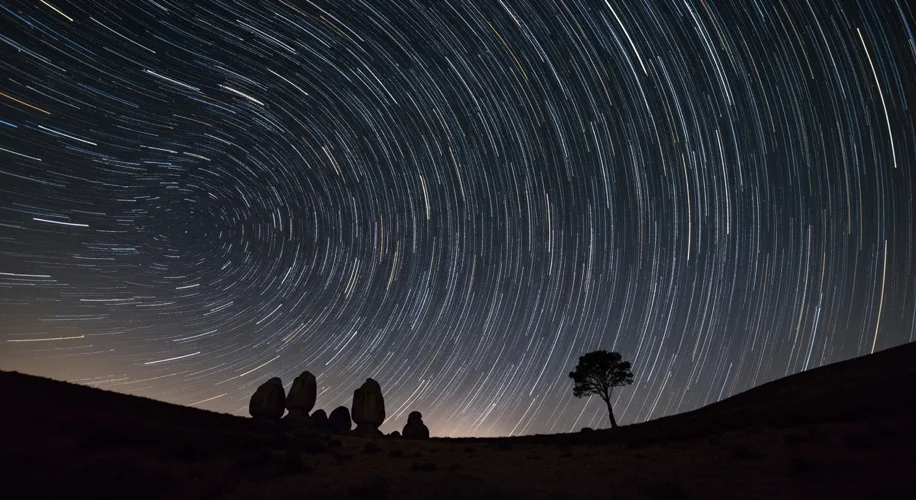
Last August, I found myself on the island of Pantelleria, a place known for its incredibly dark skies. I was aiming for a Bortle 3.5 classification, which is a fantastic rating for anyone serious about capturing the faint wonders of the night sky. My goal for the night of August 22, 2025, was to create a star trail photograph, and let me tell you, the conditions were perfect.
What is a Bortle Scale?
Before we dive into the photo, let’s talk about the Bortle Scale. It’s a nine-level scale that measures light pollution. Bortle 1 is the darkest sky imaginable, usually found in very remote locations, while Bortle 9 is a bright urban sky. A Bortle 3.5 location, like the one I found in Pantelleria, offers a wonderful balance – dark enough to see the Milky Way clearly, but perhaps still accessible enough for some travelers.
The Gear Behind the Magic
To capture this shot, I used a trusty setup:
- Camera: A full-frame DSLR (like a Canon 5D Mark IV or Nikon D850) is ideal for astrophotography because of its excellent low-light performance and dynamic range. If you’re starting out, a good APS-C sensor camera will also work.
- Lens: A wide-angle lens with a fast aperture (f/2.8 or wider) is crucial. I used a 14mm f/2.8 lens. The wide angle helps capture a broad sweep of the sky, and the fast aperture lets in as much light as possible.
- Tripod: A sturdy tripod is non-negotiable. You’ll be leaving the camera exposed for long periods, so anything less than stable will result in blurry streaks.
- Intervalometer: This device allows you to program your camera to take photos at set intervals, which is exactly what we need for star trails.
The Technique: Painting with Stars
Creating star trails involves taking a series of long-exposure photos and then stacking them. Here’s how I approached it:
- Location Scouting: Finding a spot with a clear view of the sky and an interesting foreground element is key. I found a relatively flat area with some interesting rocks.
- Camera Settings: For each individual shot, I used settings like:
- Aperture: f/2.8 (wide open to capture maximum light)
- ISO: 800-1600 (balancing light sensitivity with noise)
- Shutter Speed: 20-30 seconds (long enough to capture star movement without overexposing)
- Focus: Manually focused to infinity.
- The Shoot: I set up my camera on the tripod, connected the intervalometer, and programmed it to take photos every 30 seconds for about an hour. This gives each star a chance to move across the sky. The goal is to capture many individual frames that, when combined, show the complete circular path of the stars.
Post-Processing: Bringing It All Together
The real magic happens in post-processing. I used Adobe Lightroom for initial adjustments (like white balance and exposure) and then stacked the images in Adobe Photoshop.
In Photoshop, I layered all the individual star photos. Then, using a blend mode like ‘Lighten’ or ‘Screen’, I stacked them. This blend mode makes sure that only the brightest pixels (the stars’ trails) from each subsequent image are added, creating those beautiful continuous arcs.
The Result
Looking at the final image, it’s easy to get lost in the beauty of the trails. They are a direct result of Earth’s rotation, a constant cosmic dance that we can capture with a bit of patience and the right tools. It’s a reminder of how vast and dynamic our universe is, even when viewed from a small island.
Astrophotography is a rewarding hobby that connects you to the cosmos in a unique way. Even with a Bortle 3.5 sky, the effort is well worth the breathtaking results.