
You know, when you’re working on trimming out a room, those inside corners can be a real head-scratcher. We’ve all seen those slightly-off-looking corners where the baseboards meet, sometimes with gaps you could drive a truck through. For a long time, most folks defaulted to a simple miter cut, a 45-degree angle on each piece of trim meant to meet perfectly. But if you’ve ever tried it, especially on walls that aren’t perfectly square (and let’s be honest, whose walls are?), you know it’s rarely a flawless finish. That’s where coping comes in, and trust me, it’s a technique worth learning, even for beginners.
Coping is essentially cutting a piece of trim to fit the profile of another piece of trim, creating a snug, seamless joint. Think of it like a jigsaw puzzle for your wood. It’s especially useful for inside corners because it allows each piece of molding to sit flush against the wall, regardless of how perfectly square that corner is. A miter cut tries to force two angled pieces together, and any imperfection in the wall angle means a gap.
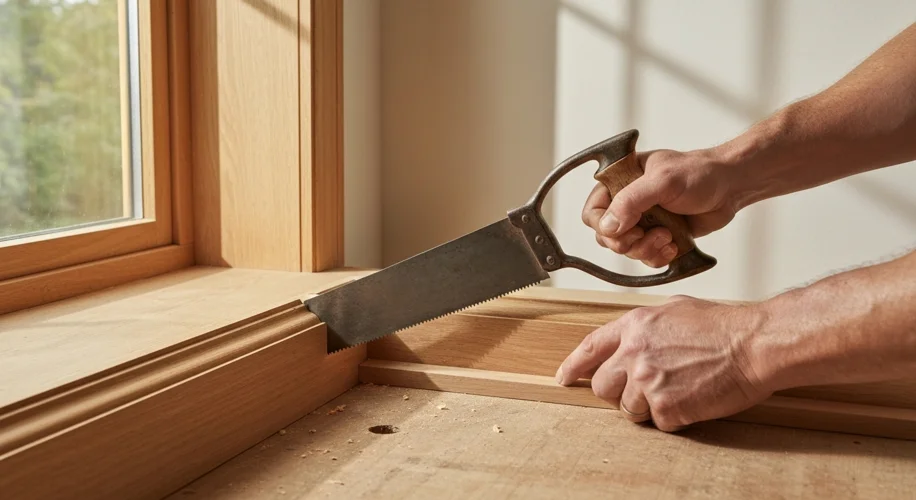
So, how do you actually do it? It’s a two-step process: first, you make a miter cut on one of the pieces, and second, you use that cut as a guide for a coping saw.
Let’s break it down. For that inside corner, pick one piece of baseboard. On the other piece that will meet it, you’ll want to make a miter cut. For an inside corner, you’ll typically cut this at a 45-degree angle, but you’ll cut it away from the wall, meaning the long point of the angle will be on the front face of the molding. You’ll do this on both pieces that meet at the corner. Now, choose one of those pieces to be the ‘cope’ piece.
Using a coping saw (a small handsaw with a fine blade), you’ll carefully cut along the inside edge of that miter cut. The goal is to remove the wood in such a way that the profile of the molding is maintained, creating a sort of convex curve that will fit snugly against the concave shape of the other piece of baseboard. You’re essentially following the contour of the molding.
It might sound a bit fiddly, but with a little practice, you’ll get the hang of it. The key is a sharp coping saw and a steady hand. After you’ve made your cope cut, test fit the pieces. You might need to make minor adjustments with a rasp or sandpaper to get a perfect fit. When done right, the two pieces will slot together so tightly that you’ll barely see the seam, and they’ll sit flush against your walls.
Why bother with this extra step? Because the result is a much cleaner, professional-looking finish. It shows attention to detail and elevates the look of any room. While a simple miter might seem quicker, the frustration of dealing with gaps often makes coping the better choice, especially when you’re aiming for that perfect, polished look. It’s a small technique that makes a big difference in the final outcome of your home improvement projects.